5 Steps to Building a Cloud-Ready Application Architecture in AWS

Amazon Web Services (AWS) is an IaaS, commonly known as Infrastructure-as-a-Service, that is responsible for creating a huge gateway for cloud computing. This platform further specializes in services and organizational tools that range from content delivery services to cloud storage, and so on. 

But when it comes to creating cloud-ready applications, then there are a ton of things that you need to cater to, in order to ensure a smooth flow of elements and functions within the application itself. Let’s dive into the basic explanation of what’s cloud-ready and how is it different from the traditional cloud-native method.

Cloud-Ready Architecture vs. Cloud-Native

Cloud-native and Cloud-ready architecture may be branches of the same field, but they are polar opposite setups. Cloud-Native applications were originally designed for container-based deployment for the public cloud, and they use agile software development to get things done. 

Cloud-ready architecture, on the other hand, is a transformed classic enterprise application that is made to function on the cloud. They may not be able to utilize all the functions that the public cloud has to offer, but there are a significant number of productive assets that we can create and use from this transformed architecture.

However, when creating cloud applications, there are certain aspects you need to integrate and look out for in an AWS well-architected framework, to create a solid foundation that holds onto all the integral functions of the applications and caters to all the requirements of cloud-ready application architecture in AWS.

The AWS well-architected framework is designed on the 5-pillar model that ensures not only smooth transitioning but also lives up to the expectations of the client with timely and stable deliverables. Those AWS five pillars are as follows: 

  1. Design and operational excellence of AWS well-architected framework

The AWS architecture best practices start from the operational excellence which includes the key objectives of your business goals and how the organization can effectively work around them to gain insight, provide the best solutions and bring value to the business altogether. The design principles are categorized as follows:

  • Use of codes on all mediums of the workloads (infrastructure, applications, etc) to maintain autonomy and limit human error as much as possible. 
  • Create flexibility by updating small changes and upgrades to the system which can be reversible without any damage.
  • Evolve and upgrade your systems by refining the functions and procedures now and then. Set days to effectively work around and improve the system with your team to familiarize them with the changes.
  • Anticipate, trigger, identify and solve all the potential failures by diving in deep and conducting frequent testings and understanding the impact it creates, and familiarizing your team with it as well.
  • Share all the necessary trial and error outcomes with your team and engage them in all the learnings that you deciphered during necessary operational procedures. 
  1. Consistent and reliable performance (workloads) 

It is necessary to maintain a smooth performance while building cloud infrastructure on AWS well-architected framework. Maintaining performance efficiency will lead to smooth transitioning in demand and technology, without creating any disruption of any sort and simultaneously ticking all the right boxes. To maintain the flow, a few of the best cloud designing practices are followed, they are as follows: 

  • Utilize advanced technologies as services that your team can incorporate in your projects, by delegating their setup to the cloud vendors and including them in your cloud application.
  • Go global by distributing your workload amongst numerous AWS regions to bring down the delay rate and make things quick at a fraction of a price.
  • Discard physical servers and use wireless modern techniques like cloud technologies for service operations and reduce the transactional cost of physical servers by restricting them to traditional computing activities.
  • Broaden up your horizon and dive into experiments with different configurations and more.
  • Follow the mindset and approach that you deem fit for your goals and achievements.
  1. Reliable architecture 

It is necessary to encompass a reliable and effective architecture on AWS that enables a consistent workflow throughout the functionality of the application. There are several principles that one needs to look into while building cloud applications on AWS. They are as follows:

  • The system should enable an automatic recovery whenever a threshold is breached. With an effective automation process, the application can anticipate and conduct a remedy of the supposed failure before it affects the system.
  • A test run on all the procedures is necessary, which will help fix multiple failures before they happen in real-time. 
  • Reduce failure on overall workload by placing a large resource over multiple smaller ones. Scale horizontally to reduce any distribution of failures.
  • Monitor your service capacity based on your workload without “assuming” anything, as it is one of the common factors of on-premises failures.
  • Conduct any changes via automation, to track and review them throughout the process. 
  1. Security aspect 

Security has become a crucial aspect for applications to think of, especially cloud-based applications. This security pillar helps create a safe and secure environment for the application, keeping all the data, assets, and crucial information safe from all ends. There are a few factors that one must follow to maintain a secure platform while building cloud infrastructure architecture. 

  • Create a loop and traceability amongst the application and track activities in real-time.
  • Application of security and verification on all aspects and layers of the application.
  • Enforce strict authorization on all levels to interact with AWS resources.
  • Categorize data into security levels and limit access where necessary with high-level encryption.
  • Eliminate direct access to data with effective tools to reduce misuse of data. 
  • Conduct a drill to test emergency security features and automatic responses, and prepare for the right responses accordingly.
  1. Cost optimization

Cost Optimization is a crucial part of cloud-ready applications, mainly because it allows you to not only achieve the services at the lowest price point but also help predict the amount that will be spent in the future. It will also keep a tab on the necessary expansion and its expenses once the business takes off for good. 

Cost optimization is impossible without following a certain set of pillars, as stated below: 

  • Invest time and money in cloud financial management to learn more about it. 
  • Pay only for services that you use, and calculate the time that it takes on an average per day to further slash the cost.
  • Calculate the workload from the associated cost, and compare the data to increase the output and further cut down on things with little to no output, to increase functionality.
  • Allow AWS to cater to the heavy-lifting, and do not spend on unnecessary items that are not your forte, like IT infrastructure and all. 
  • Swiftly analyze the expenses and compare them to the collective and individual usage, workload and help optimize it to increase ROI.

Final Thoughts

With our thorough description of the AWS well-architected framework, you can easily build a cloud-ready application architecture on Amazon Web Services. The 5 pillars of operating a reliable, secure, and super cost-effective system will ensure a streamlined application construction, maintain a smooth workflow, and help create a well-groomed cloud-ready application architecture.


7 Reasons why companies are shifting to AWS cloud

Cloud migration to AWS means leaving behind a major hassle of on-premise resources and the traditional cloud infrastructure that organizations used to rely on. Not only is AWS a secure way for cloud migration, but is also a sustainable way to secure your data while deploying your workload.

AWS cloud migration was one of the leading practices in 2020. As the global pandemic rose, businesses were forced to choose a stable, remote setup for sustaining their businesses in the otherwise crashing market and securing their future in the e-commerce industry. The following factors contributed to their decision:   

  1. End-to-end security

Data security and privacy are two things that companies can never compromise on. Before AWS migration, customers must understand the AWS Shared Responsibility Model that the service follows. Here, AWS takes complete control over the technical features that it provides, including, but not limited to software, hardware, communication between the servers, etc. Methods like two-way authentication, data encryption, monitoring, and threat detection are all responsibilities that Amazon Web Services looks after. Meanwhile, the customer will keep an eye out for the services they opt for, and all the technicalities that come along with it, including the sensitivity of their data and all the regulations and laws attached to it. 

  1. Better cost management 

AWS has always been a step ahead in terms of cost management and creating packages for businesses and users only, based on the services and resources that they provide. When it comes to cloud migration, cost plays a vital role in luring potential clients towards AWS cloud migration services. 

Even startups, with unstable funding, can take advantage of the low-cost entry which otherwise would cost hundreds of thousands of dollars in services, configurations, and network equipment. Not only is this move to cloud beneficial from technical aspects, but also results in better cost management throughout your project, sitting well within your budget. 

  1. Scalability 

The ability to grow in an orderly manner is one of the major benefits of cloud migration on AWS. It is designed to expand as your business grows, and downscale as per your business’s requirements without any major infrastructural changes or loss of data. AWS cloud migration will be flawless on both ends. The option for scalability on AWS will enable you to handle the toughest and the most hectic hours of the day or night, without crashing the system or leaving loopholes for the system to corrupt. 

  1. Self-service model

With no physical hardware upgrades needed in an AWS cloud, organizations have complete control over the IT infrastructure. It enables them to work around the system without any restrictions and make swift changes to develop and deploy a faster and effective application for the client. To further enable organizations to maintain smooth operations, they can invest in a cloud management platform (CMP) that will overlook operations and maintain stability within the system.

  1. Compliance

Another bigger advantage of AWS server migration service is its AWS compliance program, where it offers a high-end security system with compliant packages curated solely to cater to the needs of the clients based on their industry. But while the AWS cloud migration takes clients towards a more compliant environment, organizations must be prepared with a set of AWS certified IT professionals to maintain it without leaving it exposed in any way.

  1. Lower latency

Amazon Web Services will decrease latency via AWS Direct Connect which allows you to link up your on-premises and private workload to an available AWS data center via your internet connection. There are numerous AWS data centers located around the globe to reduce latency, and so far it has done a tremendous job in maintaining a smooth path of migrating your existing applications to the AWS cloud.

  1. Disaster recovery

Cloud migration and data handling is a risky process, and if not done effectively, can lead to severe consequences for the organization, which also includes losing a ton of data. This is where AWS steps in; precisely the thing about AWS which draws in clients from across the globe. Its ability to handle the toughest man-made and technical storms that make their way towards the cloud and the data stored within. But migrating your existing applications to the AWS cloud must be handled by an IT personnel familiar with the AWS cloud migration process. 

FAQs for Reasons why companies are shifting to AWS cloud

AWS cloud is a secure and sustainable platform for businesses and individual users running digital applications and websites. It is a cost-effective method, catering to all budgets and creating growth opportunities as things go along the way.

The possibility of growth, scalability, and a secure platform for businesses has encouraged businesses to practice the AWS cloud migration as they make their way into the futuristic form of cloud computing and technology.

Best Practices in Test Automation

If you are working in a software development organization, you must have heard quite a bit about test automation. Automation testing is an emerging technology in the field of Software Testing and acts as a life savior for testers by automating menial and repetitive tasks. It is shaping the future of manual testing by using tools and technologies to create test automation best practices that result in a flawless product. Automation planning and testing help the teams to improve their software quality and make the most out of their testing resources. It also helps in earlier bug detection, improving the test coverage, and speeding up the testing cycle.

With automation fast-gaining popularity, almost every company wants to dive into the sea of automation. Cost-effective automation testing with the best QA automation tools and a result-oriented approach is becoming crucial for companies.

Unfortunately, not all companies are getting desired results from their automation efforts. Many people don’t exactly know from where to start and extend up to what level. Some people have apprehensions about automation and thus fear of failure stops them from adopting it in their regular testing process. Failure of automation can have multiple reasons like:

  • Unclear automation scope/coverage  
  • Unstable feature/software 
  • Unavailability of automated test cases 
  • Time &  budget constraints
  • Unsuitable selection of automation tool
  • Unavailability of skilled people
  • Manual testing mindset
  • Testers unwilling to align with fast-paced technology

The right planning and good approaches to execute the plan can settle things more appropriately. The same is true in automation testing where the right decisions,  best test automation tools, approaches, and techniques can make a big difference.

Effective measures for successful Automation Testing

Here are some basic yet effective tips that you should keep in mind before moving ahead with automation testing.

Set Realistic Expectations from Automation Testing

1. Set Realistic Expectations from Automation Testing

The primary purpose of automation is to save time for manual testers and perform testing in an efficient, effective, and quick way. However, automation is not supposed to find out flaws in test designs, test development, planning, and execution. Don’t expect automation to find extra bugs that you don’t define in your test automation script. Accept the fact that automation is not the replacement of manual testers, it is here to provide confidence to the stakeholders that features are working as expected across builds and nothing is broken.

2. Identify your Target Modules

“If you automate a mess, you get an automated mess.” (Rod Michael).”

Thinking to automate the overall project is not a good approach. It’s always a smart approach to be concise, use a risk-based approach to analyze project scope, and then decide test coverage. Here are a few things to keep in mind:

  • Always pick the area that is stable and there are no major changes expected in the future.
  • Pick tasks that consume a lot of the tester’s time in areas like performance, regressions, load, and security.
  • Features that are in early development should not be your choice for a QA automation tester.
  • Don’t consider automating the UI that is going to undergo massive changes.
  • Make sure you have a collection of stable test cases run by manual testers. Once manual testers mark the test cases stable/approved then you should proceed with the test automation.

3. Pick the Right Test Cases to Automate

Always start with Smoketest cases of the identified module. Next, move on to the repeated tasks like Regression Test Suite, tasks that can experience human errors like heavy computations, and test cases that can introduce high-risk conditions. This is how the priority should be set for automation. You can also add data-driven, lengthy forms and configuration test cases that will run on different devices, browsers, and platforms.

4. Allocate Precise Budget and Resources

During automation, time, budget, and availability of skilled and trained automation resources are a big challenge. To cater to this, always choose automation for those projects that don’t have time constraints and tough deadlines. Ideally, choose automation for long-term projects. Your target projects should have enough budget in terms of resources so you can easily hire trained and skilled people. For resources, you should consider the following:

  • Assign automation duties to specific resources who possess sound knowledge of any programming language and are well aware of automation standards, strategies, frameworks, tools, techniques, and analytical skills.
  • Open to challenges, has strong problem solving and analytical skills.
  • If someone from the manual team is willing to perform automation then proper training should be provided and manual duties should be removed from that resource.

5. Pick the Right Tools for Automation

Tool selection should be based on the nature of the platform (Mobile, OS, Web). Ideally, a tool should be in the same language as the application so internal help is available, plus your selected tool must have support available. Price is another factor of consideration like either tool is open source or licensed. Consider the ability of the tool to integrate with other tools like JIRA or TestRail. Prefer those tools that require a flatter learning curve and are easy to use. The team should be able to adopt that new tool and easily work on that.

6. Estimate Automation Efforts Correctly

You can’t say that you can automate an average of 50 cases in 5 hours because each case will be different in terms of logic, complexity, and size. Always provide estimates in effort/hours against each case or the most appropriate way is to provide consolidated estimates feature-wise. For example, if there are two features, say, signup and login, then provide the average time for both features separately.

7. Capitalize on the Learning Opportunity in Automation

Consider automation as a growth and skills development opportunity for both organizational and individual levels. Accept the challenges/issues which you faced during automation as your learning point and try fixing them. Automation will not only develop your skills but also help to compete within the market and raise our worth and standard.

8. Make Automation a Part of CI/CD

CI/CD is used to speed up the delivery of applications. For continuous testing, you should set up a pipeline for automated test execution. Whenever developers merge the code into branches, these changes are validated by creating a build and running automated tests against the build. By doing so, you avoid integration conflicts between branches. Continuous integration puts a great emphasis on test automation to check that the application is not broken whenever new commits are integrated into the main branch. Here are some best practices to follow:

  • Your automation code is aligned with the stable branch in which developers are going to merge their changes.
  • Setup execution email during configuration which will be received at the end of each execution. 
  • Keep an eye on the results in case of build failure/conflicts with your automation test cases.
  • Once the status of test cases is passed, the build should deploy to production.

9. Implement the Best Coding Practices for UI & Functional Test Automation

Apart from the above practices, we should consider some important points while doing automation as we need to uphold international coding standards.

  • Make full use of version control software. Don’t keep the code locally. Always push your code even if you made a one-line change.
  • Remove unnecessary files/code from your automation project.
  • Remove unnecessary comments from your code.
  • Use boundary value analysis, equivalence partitioning, and state transition techniques in your automation.
  • Have a separate testing environment for automation.
  • Follow the best coding practices of the chosen programming language.
  • Always use dynamic values and avoid using static data and values in your code.
  • Use implicit wait instead of an explicit wait to boost efficiency. 
  • Implement a reporting mechanism so you have an execution report at the end of every execution cycle.
  • Capture screenshots in case of failure for failure investigation.
  • Log bugs on JIRA, TFS, and teamwork.
  • Write code that is reusable and easy to understand.
  • Refrain from writing too much code in a single function; use the concept of high and low-level functions.
  • Your code should be reviewed by a Senior Automation tester/Developer.
  • Use a page object model where you will define your functions in one file and test cases in another file.
  • Make sure your code is clean, readable, and maintainable.

Advantages of using best practices in automation testing

Implementing these automated testing best practices will help you improve the coverage of your test cases, make the testing process fast, easy, and convenient, and keep your code maintainable. It’s also very cost-effective as well as long-lasting and will future-proof your automation testing for any applications or projects. This will help boost productivity, save you time and money, and enhance your skill set.

In The End

Automation is not rocket science. It’s just a matter of proper techniques and approaches that you follow. All you need to do is some brainstorming on the best strategy, R&D on tool selection, identifying your team skills, defining your project scope, and then just starting the automation. You will soon begin to see why automation testing is all the rage in this day and age. The one-time-right investment in automation (time, resources, and budget) will save you from many hurdles in the future.

FAQs For Test Automation Best Practices

Good coding practices while automation includes a series of things, like removing unnecessary codes and comments from your project, having separate testing environments, capturing screenshots whenever you detect a failure, and more.

Some of the key factors while conducting advanced text and automation start from setting realistic expectations, picking the right cases, the right tool. Allocating the best budget and selecting the best team to conduct all these testings.

Why successful businesses prefer custom software over off-the-shelf

Offering a digital solution for clients is the ultimate futuristic goal of every company, whether it be e-commerce, healthcare, or on-demand service delivery. But lately, this has become more of a necessity instead of a company’s “5-year plan”. 

The post-pandemic era has forced numerous businesses to move their modes of work to a much more digitized and remote platform that is easy to access and control from anywhere. These digitized platforms are classified into two categories, custom software development (CSD) and off-the-shelf software. The real struggle arrives when it comes down to choosing any one of the two software.   

Before we begin, there are numerous factors to consider when narrowing down the options and technicalities of either type of software. To make an informed decision, the first step is comparing the two setups, and having a basic understanding of when custom software or off-the-rack software is required. What are they, what distinguishes one from the other, and most of all, how are they going to benefit the client and their business without causing much disruption to the system? 

Custom software vs. off-the-shelf: what are they?

Off-the-rack and custom software are polar opposites. Despite offering similar services, they are extremely different from each other. Let’s take a look at what they are. 

Custom-made software

Off-the-rack and custom software are polar opposites. Despite offering similar services, they are extremely different from each other. Let’s take a look at what they are. 

Custom software application development is a dream project that every software development company loves to work on. It is completely custom-built, made exclusively by following a brief provided by the client. 

Custom Software Development focuses on the client’s product goals and needs, targets an idea, and works around it to cater to market needs. VentureDive plays a vital role in executing that idea into reality, with an in-house team of expert engineers and designers working extensively on individual custom-made products. Companies opting for custom software development usually have a clear understanding of the service and the approach that they need to create an amazing product, and VentureDive takes it one step further with its top-notch skills and execution.  

But why do businesses opt for CSD? Well, there are a number of factors that give customized application software an upper hand in the software development industry. Some of these include: 

Time: Creating custom-written software is a lengthy process, to say the least. It takes months of hard work, research, and a highly-skilled procedure of quality assurance to finally create a product that is well suited for the client’s needs. It may be time-consuming but is definitely worth it in the long run. 

Cost: The high initial cost is a given with this bespoke software, but if you look at it in a way, it’s a long-term investment that will only generate tons of revenue and branch out in the long run. And keeping this in mind will relieve you of the need to pay frequently for minor upgrades or bug fixes.

Maintenance: Speaking of bugs, one of the major advantages that custom-made software has is that there is barely any need for frequent maintenance, as it is built by experienced developers and engineers with flawless execution. The only maintenance it may require is when the software requires an update.

Scalability: With custom Software development, the possibilities for expansion are endless. Modification and customization according to the client’s needs and demands is a huge benefits of custom solutions. This leaves room for scalability in the near future as the business expands and grows, without having to strip down the existing UI and create everything from scratch.

Off-the-shelf software

What is off-the-shelf software, and what features and advantages do it bring to the industry? Off-the-shelf software may have been under the radar for quite some time as it is a great opportunity for small businesses to dive into the digital market. Off-the-shelf software is ready-made software, which may have different packages available for sale. It usually comes with a set of pre-installed features and plug-ins that you can utilize for your business. 

Time: A perfect solution if you are under a time constraint, or need go-to-market results quickly. Off-the-shelf software solutions are easy to acquire, as they are ready-made and available in the market at all times. Since it’s readily available, it is the first option for countless small-scaled businesses that have little knowledge about software development, and reach for an option that is simple and quick.

Cost: Off-the-shelf solutions applications are extremely cost-effective initially. The readily available setups are generated for the masses, with a ton of potential buyers who are trying to build a business on a budget. But there are several hidden costs attached to off-the-rack systems that clients are unaware of in the beginning. These are the costs of frequent updates or maintenance to fulfill the client’s needs which are otherwise not being met, giving them another reason to switch to custom-made software. And not to mention the subscription and licensing fees like we get to see in SaaS.

Large Community Support: The best feature of off-the-shelf software is that you have a large community to turn back to in case you run into an issue with your program. Since it’s a commonly available setup, acquired by numerous businesses, a chain of similarity runs throughout, which means that others must have faced the same issues as you have, and they might have a solution for it that you can use. 

References: Prior user experience and references of off-the-shelf software are of great help for businesses, to decipher whether the application is suitable for them or not. A trusted system and setup will help clients get an idea of what awaits them, and can even opt for a trial run before investing in the product completely.

Custom software: pros, cons, and everything else

Pros

  • A custom-built setup is made from scratch, tailored to the client’s needs mentioned in their requirement brief.
  • Works on a “you dream, we create” basis, where there is no limit to what functionalities you can feature in your product. 
  • No hidden charges or frequent upgrades and maintenance on the product.
  • Custom software can not be replicated in any form, giving you an upper hand over your competitors in the market. Your product will remain relevant and unique in all forms.
  • Undergoes thorough QA in all development phases of the product, with back-and-forth communication for smooth transitioning. 
  • Fool-proof setup with no bug-ridden issues and flawless design and UI.
  • A team of specialized engineers and developers familiar with the product will be available at all hours for immediate fixes if needed. 

Cons

  • Custom software takes months to get ready and reaches perfection after thorough testing and development phases. If you are looking for a quick fix, this is not it. 
  • It is expensive! Custom software development is something that will cost you a lot, but it is a one-time investment with no hidden charges and does not require you to pool money for every upgrade. 
  • The client will always be dependent on the company creating the software for any fixes and upgrades, in case they are not available, it can lead to several issues caused by the delay. 

Off-the-shelf: pros, cons and everything else

Pros

  • Off-the-shelf software will save you a ton of money and time. Not only is it cheap but also readily available for clients to license and acquire. 
  • Small-scale businesses have a huge advantage with off-the-shelf software; it can be the best platform for them to enter the digital market, with promising results leading to a successful business. 
  • Clients won’t have to think much while acquiring off-the-shelf software, as there are numerous reviews and references available on the web, vouching for the reliability and functionality of the product.

Cons

  • Off the shelf solutions are temporary. In the longer run, it will not support your requirements, and you will have to shift to a custom software as it offers reliability and scalability.
  • Off-the-shelf software will not be able to cater to all the client’s requirements and will demand frequent and expensive upgrades to fulfill their specific needs. 
  • You will have to pay for services that you may never use, and it might cause your software to lag and interrupt functions of the existing services in use.
  • It’s impossible to alter or modify according to your project’s needs, you will have to work around the existing features that may limit the functionality.
  • Off-the-shelf software is easily replicable, no matter how hard you have worked on your project, your competitor has an advantage over you, and they can easily reproduce your work.
  • Companies are going to outgrow OTS soon when they reach their full potential, leaving them back to square one on what they should do to further excel their product and brand. 

Final verdict

In this off-the-shelf vs. custom software race, it’s clear as to why businesses prefer custom software solutions over off-the-shelf software. Not only is it the best setup for a rapidly growing business in the vast industry of digital marketing, but it is also a fruitful investment that will give back to your company as well as fulfilling its purpose rightfully.

FAQs for custom softwares and over the shelf softwares

Off-the-shelf software’s advantages range from being a quick and cost-effective solution for small scale businesses. It maintains a good repute in the market with numerous references and reviews, enabling people to have a good idea of what they are buying. Moreover, users can also have a short trial of the services with tons of in-built features all at a super affordable and convenient initial price.


Custom developed software is a dream transitioned into reality, whatever the client wishes to see in their product, the custom software development companies make it possible, with a fully customized setup. Moreover, it also has the ability to make immediate changes without costing extra frequently. It is flawless, with countless testings done and top-notch quality assurance phases to make it possible.


Not really, off the shelf software is there because users need a ready-made solution in a strict time frame. And these software are already configured with numerous sets of tools and features that will remain a part of the application, even if you require it or not. Of course, there are going to be frequent upgrades within the software that the client must look out for.


Top 10 Tips for Cost Optimization in AWS

To start with, Amazon web services is an Infrastructure as a Service also known as IaaS which offers a variety of services. AWS is an extensive and evolving cloud computing platform that offers organizational tools such as database storage, compute power, and content delivery services.  

Cloud computing allows you to save significant costs once your infrastructure is set up and data migration is completed. Even after this, it is advised that you optimize your costs to avoid any miscalculations or surprises. Cost optimization in AWS not only allows you to refine costs it also improves the system over its life cycle resulting in maximizing your return on investment. In this context,  we have listed 10 best practices and handy tips to optimize AWS cost and performance for your business.

1. Select the Right S3 Storage Class

Amazon Simple Storage is an AWS storage service that enables your cloud to be extremely reliable, scalable, and secure. Amazon offers six tiers of storage at various price points. To determine which tier is best suited for business you can depend on factors such as usage and accessibility of your data and retrieving data in case there is a disaster. The lower the tier the more hours it will require to retrieve data. 

AWS S3 Intelligent Tier case is one of the six tiers being offered. The plus point in this tier is that it automatically analyzes and moves your data to the appropriate storage tier. S3 Intelligent Tier further helps inexperienced developers to optimize the cost of cloud-based storage.  This class saves you an immense amount of cost by placing objects based on changing data patterns. If you know your data patterns, you can combine that with a string Lifecycle policy to select the perfect storage classes for your entire data. 

Since various classes will break down your costs differently, an accurate and calculated storage class will result in guaranteed cost savings.

2. Choose the Right Instances for Your Workloads

When it comes to instances, you can choose from different instance types according to your costs and configurations. In this regard using AWS instance scheduler can be very helpful.  Selecting the wrong instance will only increase your costs as you will end up paying for storage that you do not even require. This false decision can also make you end up underprovisioning. Which means you have a limited capacity to handle the workload and data. There is always an option to either upgrade or downgrade, depending on your business need, or move to different instance options and types. Staying up to date on this will help you save money and reduce costs in the long run.

3. Track, Monitor, and Analyze Cloud Usage

There are different tools available to monitor and track instance metrics and data. To plan your budget accordingly you should have a clear understanding of your data usage. An assessment of your workload will help you in making that decision. The workload can be easily assessed with the data gathered. If there is a need then the instance size can be scaled up or lowered.

 Amazon trusted advisor is one of the tools that you can use. This tool keeps a weekly check on the unused resources while also helping you optimize your research usage. 

These tools also provide real-time guidance for the users to assist in restricting the resources used. There is also a timely update to assure the safety and security of data. Naturally, cost optimization is also addressed.

4. Purchase Reserve and Spot Instances

Purchasing Reserved Instances is a simple way to reduce AWS costs. But it can also be an easy way to increase AWS costs if you don’t employ the Reserved Instance as much as you expected to or choose the wrong type of Reserved Instance. Therefore, rather than suggesting that purchasing Reserved Instances is one of the best practices for AWS cost optimization, we’re going to recommend the effective management of Reserved Instances as an AWS cost optimization best practice—effective management consisting of weighing up all the variables before making a purchase and then monitoring utilization throughout the reservation’s lifecycle.

Reserved instances also let you purchase a reservation of capacity for a one or three-year duration. In this manner you pay a much lower hourly rate than on-demand instances, reducing your cost up to 75% on cloud computing costs.

5. Utilize Instance Scheduling

It is essential to ensure that all non-critical instances are only started when they need to be used. You can schedule start and stop times for such instances as required in software development and testing. For example, If you work in a 9-to-5 environment, you could save up to 65% of your cloud computing costs by turning these instances on between 8 AM and 8 PM during working hours.

By monitoring and checking up on the metrics it can be determined in the process where the instances are used more frequently, there is always a chance that the scheduling can be interrupted, and that also when access to the instances is required.  It’s worth pointing out that while instances are scheduled to be off, you are still being charged for EBS volumes and other services attached to them. 

6. Get The Latest Updates on Your Services

AWS strives to assign cloud computing for personal and enterprise use. They are always updating their products and introducing features that improve the performance of services. When AWS announces newer versions of instances, they consistently feature better performance and improved functionality. Upgrading to these latest generations of instances saves you money and gives you improved cloud functionality.

7. Use Autoscaling to Reduce Database Costs

Autoscaling automatically monitors your cloud resources and then adjusts them for optimum performance. When one service requires more computing resources, it will ‘borrow’ from idle instances. This option then automatically scales down resource provision when demand eases. In addition to this auto-scaling also lets you adjust scaling on a schedule for predictable and recurring load changes. 

8. Cleaning Up EBS Volumes

Elastic Book Store (EBS) is the volume for storage that all the Amazon EC2 instances are using. These are added to your monthly bill, whether they are idle or being used. If these blocks are left lying idle, they will contribute to your expenses even when the EC2 instances are decommissioned. Deleting unattached EBS blocks when decommissioning instances will cut your storage costs by up to half.

There could be thousands of unattached EBS volumes in your AWS Cloud, depending on how long your business has been operating in the cloud and the number of instances launched without the delete box being checked. It is definitely one of our AWS cost optimization best practices to consider, even if your business is new to the AWS Cloud.

9. Carefully Manage Data Transfer Costs

There is always a cost linked with transferring your data to the cloud. Whether it is a transfer between AWS and the internet or between different storage services,  you will have to pay a cost. Transfer costs with the cloud providers can add up quickly in this process. 

To manage this better you should design your infrastructure and framework so that data transfer across all the AWS is optimized. You should be able to complete this transfer with the least amount of transfer charges possible.

10. Terminate Idle Resources

The term “zombie assets” is most is used to describe any unused asset contributing to the cost of operating in the AWS Cloud.  Other assets that contribute in this category are components of instances that were activated when an instance failed to launch, unused Elastic Load Balancers., obsolete snapshots, and unattached EBS volumes. A problem businesses face that when they are trying to implement AWS cost optimization best practices is that some unused assets are difficult to find. For example, unattached IP addresses are sometimes difficult to locate in AWS System Manager, Any unused asset that contributes to your overall AWS expenses is a ‘zombie asset’. There are tools like CloudHealth that will help you identify and terminate zombie assets that contribute to your monthly bill. Anything you don’t use and isn’t planning to use in the future should be deleted with the help of such tools.  Such tools will help you reduce costs by deleting idle load balancers.

In conclusion:

With a continuing need for businesses to take a position within the latest, competitive, and result-oriented technology, it becomes important to seem at cost-saving tools and factors.  AWS offers you powerful cloud computing tools you can use to transform your business and its needs. But if you are not so proficient in using AWS services and tools, AWS can cost you a lot of money. These AWS cost optimization tips above will help you reduce the expenses of using the AWS platform. Cost optimization in AWS is a continuous process.  You can’t perform it once and then never visit it again. You should continuously monitor your resource usage and instance status to make sure you only pay for the assets you require. 

Therefore, try these AWS cost optimization best practices and get ready to optimize your cost without compromising performance.

Top 3 Practical Use Cases of Amazon S3 Intelligent Tiering

Businesses large and small are rapidly becoming cloud-native, leaving on-premise data centers behind. Why? A major reason is no requirement for storage hardware and a much more efficient running of mission-critical workloads and databases. However, many businesses that are new to the cloud or even those that are already on the cloud, find themselves battling with rising cloud costs. As they scale and begin facing unpredictable or undefined workloads, operational inefficiencies are more likely to appear within their cloud infrastructure, which adds to their cloud bill. 

What is S3 Intelligent Tiering & who is it for?

Companies that adopted or migrated to AWS cloud, can easily save on their cloud bill with efficient governance, and intelligent tiering using Amazon S3. This AWS feature is especially suited for businesses that are new to managing cloud storage patterns, and lack experience therein; or, are more focused on growing the business and have little to no time or resources dedicated to optimizing cloud operations and storage. S3 intelligent tiering optimizes storage costs automatically based on changing data access patterns, without impacting application performance or adding to overhead costs. 

Before we move on to discuss some of the practical use cases of S3 intelligent tiering, let’s learn a bit about how it actually works. S3 intelligent tiering stores objects based on how frequently they are accessed. It comprises of two access tiers, one that is optimized for frequent access, and another for infrequent access. The latter is also known as the ‘lower-cost tier’. S3 intelligent tiering automatically move less frequently used objects – e.g. those that have not been accessed for 30 consecutive days – to this tier, by continuously monitoring data access patterns. 

Let’s talk about the top 3 use cases where cloud-first businesses can cut costs and drive savings using S3 intelligent tiering. 

#1 Understanding Storage Patterns

Here’s a rough estimate of AWS storage costs: if your business requires 1PB of data storage, this will cost you around $300,000 annually in storage costs if you use the S3 standard. If you’re new to the cloud or just starting to experiment with cloud storage options, you may observe a rise in your AWS cloud bill. This usually happens due to a lack of understanding of how and when your data access needs change. S3 storage offers you lifecycle policies and S3 storage class analysis that tells you when to move your data from one access tier to another, and save on your AWS spend. 

S3 Intelligent tiering helps you optimize your storage automatically by moving data between the frequent and infrequent access tiers. This means you will save money that would otherwise be used to store dormant data. The frequent access tier charges you for data hosting on standard S3 storage, whereas, the infrequent or archive access tier incurs lower costs of storage. In addition, when using S3 standard storage, you don’t be charged extra for transferring your data between access tiers. This also helps in keeping costs low. This means, if you’re unsure about your access patterns and data use, the S3 standard storage would be the ideal option for you. 

#2 Managing Unpredictable Workloads

Don’t know when your data workloads may increase or reduce? S3 intelligent tier is a perfect way to manage your cloud storage if you need to access assets intermittently from your cloud-based database. With flexible lifecycle policies, intelligent tiering automatically decides which data must be placed in which tier (frequent or infrequent access). This can be helpful in many scenarios, e.g. when building a database for a school,  accessing exam data would be infrequent since it will not be needed for a large portion of the school term. So this data would be moved to the infrequent access tier after consecutive 30 days of dormancy.

Similarly, in many companies, AWS S3 intelligent tiering can help cut cloud costs. Most employees store their data using different applications and more often than not forget about that data until a day comes when they need it. So if you were to use standard S3 storage only, it would incur huge data storage costs without any meaningful ROI. With intelligent tiering, you can manage what data are you actively charged for, and the dormant or infrequently used data can be moved to the lower-cost tier. 

For unpredictable, dynamic, or rapidly changing data workloads, S3 intelligent tiering serves as a powerful tool that helps ensure data availability as needed, upholding performance, and optimizing cloud storage costs. 

#3 Complying with Regulations

When working with clients and partners within the European Union (EU) region, one thing that most providers and companies have to comply with is General Data Protection Regulation (GDPR). 

GDPR harmonizes data protection and privacy laws and lists down a number of rules when it comes to handling users’ data. One of those rules talks about data erasure – i.e. private user data should be erased from your databases and websites after a certain period of time or a certain period of data dormancy. 

If you use S3 intelligent tier storage to comply with GDPR, it can save on your company’s AWS cloud bill, and optimize your storage without compromising on performance. 

If a user does not access their data for some time, it will be moved to the lower-cost storage tier, and will not cost you as much as S3 standard storage. S3 also allows you to set your own lifecycle policy where you can decide the duration of active data storage. For instance, you can choose to keep your users’ data in the frequent access tier for six months or up to a year, before it is moved to the infrequent access tier. Moreover, S3 intelligent tiering enables you to control mechanisms like access control lists and bucket policies to you always stay compliant with data security regulations. 

Long Story Short

Cloud storage incurs huge costs to companies that do not have optimized storage in place. As an AWS user, the best choice would be to opt for Amazon S3 intelligent tier storage if you find yourself looking at a high AWS cloud bill each month. With varying data workloads, lack of experience in understanding cloud storage and compliance to regulations, S3 intelligent tiering helps you optimize s3 data costs and keep cloud costs in check

6 Keys for Cutting Costs and Boosting Performance on AWS

Amazon Web Services (AWS) is one of the most powerful, robust, & widely adopted cloud platforms with the potential to dramatically reduce your infrastructure costs, deliver faster development and innovation life cycles, and increase efficiency. However, mere adoption is not enough. If your workloads and processes aren’t built for high performance and cost optimization, you could not only miss out on these benefits but quite possibly end up overspending in the cloud by up to 70%.

From cloud sprawl and difficult-to-understand cloud pricing models to failing to right-size your environment or keep pace with AWS innovation — you may face many challenges on your journey to optimization. But through the adoption of some best practices and the right help, you can get the most from your AWS cloud.

Let’s break down some of these best practices for you:

1. Enable transparency with the right reporting tools

The first step should be to understand the sources and structure behind your monthly bills. You can use the AWS Cost and Usage Report (AWS CUR) to add your billing reports to an AmazonS3 bucket that you own, and receive a detailed breakdown of your hourly AWS usage and costs across accounts. It has dynamic columns that populate depending on the services you use.  It will be helpful for you to understand methods of AWS cost optimization.  

To level up your optimization through deeper analysis, AWS recommends Amazon CloudWatch – Collect and track metrics, monitor log files, set alarms, and automatically react to changes in AWS resources.

2. Closely monitor your cost trends

Over time, as you begin to adopt AWS technologies and simultaneously monitor their costs, you will start noticing the trends and patterns in your cost. Keeping a close eye on these trends on a regular basis can help you avoid any long-term or drastic cost-related red flags. In addition to monitoring the trends, it is also important that you understand and investigate the associated causes for the spikes and dips through AWS cost explorer. This is where an AWS Trusted Advisor can be a huge help, as they can give you personalized recommendations to optimize your infrastructure, and help you follow best practices for AWS cost management.

3. Practice Cloud Financial Management

Another key factor that helps with effective AWS cost management is the AWS Cloud Financial Management (AWS CFM). Implementing AWS CFM in your organization will enable your business to unlock the true value and growth it brings from a financial perspective. For successful AWS cost management, it is essential for teams across an enterprise to be aware of the ins and outs of their AWS spending. You can dedicate resources from different departments for this cause. For instance, having experts from finance, technology, and management can help establish a sense of cost awareness across the organization

4. Use accounts & tags to simplify costs and governance

It is crucial to learn when to use account separation and how to apply an effective tagging strategy. Be sure to take advantage of AWS’s resource tagging capabilities, and delineate your costs by different dimensions like applications, owners, and environments. This practice will help you gain more visibility into how you’re spending. 

5. Match consumption with demand

The flexibility and scalability of cloud platforms like AWS allows you to provision resources according to your downstream needs. When right-sizing your resources to match demand, be mindful of horizontal and vertical over-scaling as well as run-time on unused or old resources. You can save significantly on costs incurred from wasted resources, by tracking your utilization and turning off old instances. AWS Cost Optimization using AWS Cost Explorer – See patterns in AWS spending over time, project future costs, identify areas that need further inquiry like getting a report of EC2 instances that are either idle or have low utilization, similarly checking EBS volumes and S3 buckets using S3 Analytics.

6. Tap into expertise and analytics for your AWS environment

Seek third-party expertise for technology cost management, instead of reallocating your valuable technology resources to budget analysis. VentureDive offers a comprehensive solution with support and expert guidance that will keep your AWS workloads running at peak performance while optimizing your cost savings.

Our Optimizer Block for AWS enables you to cut costs, boost performance, and augment your team with access to a deep pool of AWS expertise. Through constant ongoing cost and performance optimization, you have the confidence that your financial investment is being spent wisely, and that you are maximizing performance from your AWS workloads. And with 24x7x365 access to AWS experts, you know you’ll be ready for whatever this changing market throws at you next. 

React Native vs. Native Apps: Which is better & why?

Up until a few years ago, mobile applications were normally written in Native languages. Now, most of the market is shifting towards React Native to write their apps. Some of the big companies, like Facebook, Soundcloud, and Bloomberg, are already using this framework, and their apps are running smoothly and efficiently.

Any mobile app development begins with choosing the right tools, platforms, and frameworks that one will need to design and build it. When it comes to app development for your product, there are two paths available: Native or React Native. Choosing between the two can be overwhelming. This is why to overcome this challenge you will need to explore factors like budget constraints and the development time of each method.

The debate about React Native vs. Native apps has been long-standing. Even though it varies from project to project, let’s explore the basics of how each development approach is different and why you must choose/prefer one over the other.

Differences Between Native and React-Native Apps

React Native allows developers to write the code once but lets it run on any platform, whereas Native development requires separate coding for each platform. React Native is written in JavaScript and is known as a Hybrid framework. On the other hand, Native apps are built for either iOS or Android. These apps are built with specific programming languages for specific platforms.

Before investing your money to build your iOS and Android app or a Hybrid one, it is smart to weigh all the pros and cons. Right from the beginning, you should be aware of the possible obstacles or difficulties that might occur.  

By now, you know React Native is a platform-independent framework because it gives you the freedom to build an iOS app and an Android app on the same framework while keeping the UI and UX design of the app intact. Native jumps in when you want to build custom UI components and have a unique user experience that requires external libraries. 

We took the liberty to divide the main differences between the two into points. 

  • Support of applications: Because React Native is a new technology it, unfortunately, does not have parent support. This precisely means that the Google Play store or App store may stop accepting your app at any given time. On the other hand, Native apps are built for specific platforms therefore they meet all the requirements. 
  • Performance: This can be measured from a lot of factors e.g. animations, lags, slowdowns, and load time. Nonetheless Native runs more efficiently because it was built to run on that specific platform only. React Native is built for both platforms so it is understandable that it utilizes more battery on the device and can cause lag or slowdown. 
  • User Experience: The UX on React Native apps is compromised as mobile screen size varies. On the other hand, Native apps have the edge to design and add built-in UX UI components however they wish to maintain a visual balance on all the screens. 
  • Development cost and maintenance: Native requires two development teams for making and maintaining the app. React Native allows you to build the app using a single code base, which saves you cost as well as time spent in mobile app development
  • Long-term app development: Although React Native is a faster and inexpensive way to launch your business app, it is not as efficient with updates. The app updates and app stores are not in sync at all times. This makes it tough to build and launch any future updates.  Since Native is supported by Google and Apple, it is more coherent with updates and resolves problems as they emerge. 

React Native vs. Native App Development

Native Application Development

Native app development is centered around designing mobile apps specific to a single platform, like iOS or Android. These apps are built with programming languages and tools that are specific to a particular platform. Android apps require coding in Java or Kotlin using Android Studio for the environment. IOS requires coding in Objective-C or Swift and the IDE is Xcode. Therefore, this process needs at least two developers or development teams to build two different versions of an application, simultaneously.

Native is without a doubt a time-consuming process. But there are some solid pros that Native has to offer:

  1. Faster and more reliable
  2. Better app design and performance
  3. Robust language
  4. Accessibility of APIs

The downside of opting for Native is the following:

  1. High cost of development of two applications
  2. Higher development time

React Native Application Development

React Native is the leading hybrid mobile development framework. With React Native, you write an iOS app exactly the way you would write a web app. That sounds very convenient, but it may also cause some issues.

By using the React Native Method you will need to write the code only once and the final product can be run on iOS and Android.

React native pros:

  1. Single codebase
  2. Lower development cost
  3. Time-efficient 
  4. Reusable components
  5. Faster debugging process
  6. Faster prototyping
  7. Open-Source: Most features already have a build solution
  8. Easy maintenance

Cons attached to this process are: 

  1. Reduced number of Native elements
  2. A limited number of Third-Party Libraries
  3. Absence of support for All Native APIs

Our Approach to App Development

VentureDive has been at the forefront of bleeding-edge technology for both Native Android and iOS development and has a large pool of resources from both competencies. When we speak about React Native vs. Native app development, we include two different competencies that require separate sets of expertise to develop apps that deliver excellence and true business value.

Here’s a quick list of tools and technologies we use for both approaches:

iOS

  • Swift programming language
  • Viper and MVVM (architecture patterns)
  • iOS storyboarding
  • Core Data for iOS
  • SwiftUI (for making interfaces & screens)

Android

  • Kotlin programming language
  • MVVM, MVP & Reactive Programming with Rx Java (architecture pattern)
  • Constraint layout (with Android previewer)
  • Scoped storage for better data security
  • Jetpack Compose (design through code)

Why Choose Native App Development

Here’s why you should go for Native app development:

  • If your app is going to be complexed
  • You are more inclined towards the user experience part of your app
  • If you want in-built features like brightness control
  • If you are targeting a single platform either iOS or Android 

Why React Native for Mobile App Development

Here are some reasons you should opt for React Native:

  • Your app is minimal in terms of UI and UX
  • You want your app to available on all platforms with a reasonable budget
  • You want your app to be launched in a shorter amount of time 
  • Your business is a start-up and has limited resources and funds

When it comes to app development, React Native has been at the center of VenD. We have delivered countless immaculate projects using React Native over the years and continue to conduct training sessions for the entire mobile development team. This helped the teams gain the necessary knowledge to quickly bootstrap and deliver a React Native application. By building upon the core knowledge and expertise of the Native platform, we are able to deliver better-performing apps in a much shorter time, be it using React Native Expo or React Native CLI applications

Wrapping up: Should You Choose Native or React Native?

It is apparent that React Native meets all the requirements of the client while saving on cost and time. It gives you the best of both worlds, which is lower effort and efficient use of time and budget. If you are looking for rapid prototyping and MVP, React Native is the answer. However, if you have a lot of manpower and resources to spare, you can always opt for Native. Ultimately, there is no silver bullet. If you are in between answers, you can try to consult VentureDive

How we did it: QA Automation of Muslims by IslamicFinder

Automated software testing is all the rage in the industry and for good reason. Although manual testing is still in place in many technology companies, many fast-growing organizations have adopted QA automation testing to speed up processes, redirect manual efforts and minimize the chances of error. 

It is quite common for businesses to outsource the quality assurance processes of their software development cycle. It saves them time, cost, and resources.

This means, it’s essential for technology organizations like ours, that offer software quality assurance services, to adopt one of the most accurate, efficient, and reliable approaches to quality assurance, i.e. automation. In this article, I’ll talk about how the QA team at VentureDive carried out automation testing for the Muslims App. It is a community engagement app by IslamicFinder that aims to unite Muslims around the world through a single platform, offering networking, knowledge sharing, and learning.

Let’s dive in! 

How did we manage before QA automation?

Muslims is a hybrid mobile application developed in React-Native. It has the same code hierarchy for both, Android and iOS platforms. This means we have the same code base for QA automation as well.

While the app was in the development phase, and new features were getting integrated into Muslims continually, we were carrying out manual quality assurance side by side. The process was consuming a lot of effort – with every issue reported, the QA team had to dig down into the apps again and again, and ensure that the overall performance of apps remains optimal. Every time an issue was reported or any new build was shared with the QA team, they had to go through all the features of the app, which made quality testing a tedious and time-consuming process. 

In short, we dreaded it! 

As the application got bigger and more complex with every sprint – that meant more issues popped up that needed fixing – it was no longer possible for us to test each and everything over and over again. So we decided to create and implement an efficient testing process to reduce the testing effort of the team, as well as enhance the overall quality of the apps. Enter: a hybrid automation system for mobile apps for both, iOS and Android platforms. 

QA automation covers a lot of things we previously had to do manually and repeatedly. It took on the menial, and repetitive tasks for us, delivered better testing quality, with minimal chances of error, and helped deploy high-quality, bug-free apps. Our automation engineers began developing the QA automation process for hybrid apps so we can test each and every feature more thoroughly, using both manual and automated systems, and deliver a seamless product to the users.

Why did we decide to automate the Muslims app?

The thought process behind automating the Muslims app was that we wanted to reduce the overall testing time of the app on both, Android and iOS platforms. The idea was that once any new feature is developed and ready to merge, we automate its testing. Over time, this would enable us to have a full-fledged testing process in place, that would streamline quality assurance efforts, reduce time and cost spent, and deliver efficient and high-quality apps to customers within record time.

The whole QA automation team brainstormed a lot on how to automate the hybrid application for Muslims. We discussed different technology stacks and their pros and cons with the goal to increases the overall quality and performance of the app through a smooth QA automation process.

Why did we use the same codebase for Automation?

The grounds behind using the same code base for automation of Muslims app was that we are developing a hybrid framework, and a single code base would mean a lesser number of changes required in the automation framework. Whenever there is a change in the application hierarchy, the same code base would mean reduced development effort in the hybrid framework. Here’s a resource to help you understand the difference between hybrid and native applications, and which might be a better choice for your project.

We can also reuse this QA automation framework for any hybrid app developed in react-native as well as native apps to make lives easier for automation engineers. This would make managing the code base simpler, with lesser changes and easy integration of new features within the automation framework.

What technology did we use for QA automation?

Our QA automation engineers adopted WebDriverIO, a tool that allows you to automate any application written with modern web frameworks such as React, Angular, Polymer, or Vue.js, as well as, native and hybrid mobile applications for Android and iOS.

 We can develop any web or mobile automation framework easily using WebDriverIO due to its exciting feature set and many valuable plugins. Its libraries are easily available and can be integrated with the framework quickly, so it saves a lot of time for automation engineers.

Many technology companies choose to go with Selenium WebDriver, another tool used for automating browser testing. We used WebDriverIO and javascript for the development of automation scripts for  Muslims app with integration of unit test frameworks like mocha and chai, the assertion library, in it.

However, we chose WebDriverIO over Selenium because of a multitude of technical reasons: 

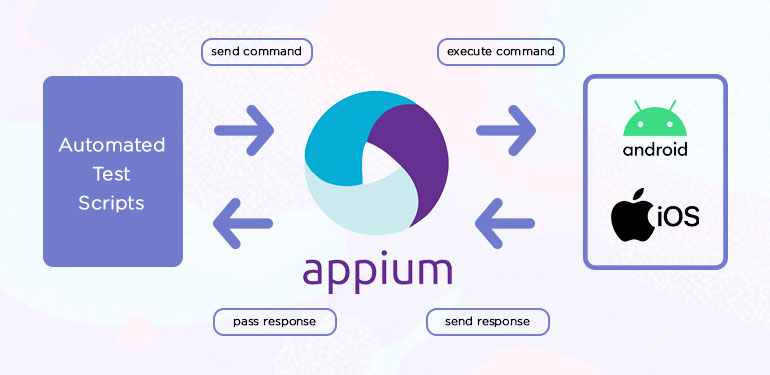
  • WebDriverIO libraries are wrappers of selenium libraries as these are developed on top of selenium libraries – it provides faster execution than using Selenium APIs with Appium, a test automation framework. 
  • WebDriverIO provides a runner class where we can define all the necessary prerequisites, which makes it easier to configure the execution of automation scripts. Whereas, we have to write a lot of lines of code to set up the configuration process of Selenium with Appium.
  • WebDriverIO has its own Appium service so it takes only a few minutes to configure Appium with it.

Using a hybrid automation framework like WebDriverIO has many advantages. For instance, a one-page object class is developed for both Android and iOS platforms so we don’t need to create a separate repository for this platform. A generic helper class package is also created to reuse the utilities within the project and we can use this framework with any project in the future if we want to develop a framework for hybrid and native apps.

Wrap up

For the QA automation of hybrid apps, you can easily develop an automation framework with WebDriverIO and Appium as it provides a lot of flexibility in developing, structuring, and maintaining the codebase. It will be up to the individual’s expertise on javascript and node.js as it requires javascript skills for a person to work on these frameworks. If you have used Selenium with Appium, it will be easier for you to use a switch on these javascript frameworks. According to my experience, if you are developing your own hybrid application, I would suggest you give WebDriverIO a shot and feel free to share your experience of working with javascript frameworks.

How agile methodologies help you optimize development processes

Whether you are someone starting in the software development business or are in the game for quite some time, you’ll agree that managing projects that don’t use agile methodologies can get very tricky.  There are missed deadlines, buggy releases, upset customers, and things that you didn’t foresee. 

It is fair to say that managing projects of different sizes come with its own level of complexity and variables. Nevertheless, you can successfully execute projects by using the right methodologies and techniques available. Project management methodologies not only help you streamline the software development process but also enable effective time management and cost reduction.

An agile methodology is a project management process, mainly used for software development, where demands and solutions emerge through the collaborative work of self-organizing and cross-functional teams, and their users. Agile has multiple methodologies including Kanban, Scrum, XP, feature-driven development, etc. All these methodologies share the same principles behind the agile manifesto.

In this blog, we will focus on the most popular methodologies used in software development, highlighting the pros and cons and the recommended use cases for each one. After reading through this article, you should be able to decide which methodology is more fitting for project needs.

Kanban

What is Kanban?

Kanban (Visual Signal – Card in Japanese) is a visual way to manage tasks and workflows, which utilizes a Kanban board with columns and cards. It is one of the most popular agile methodologies and helps you visualize your work for your own, and others’ understanding, and helps you keep everyone on the same page. To start with, you would need to build a Kanban board, then fill it with Kanban cards, and finally set up a work progress limit. The cards represent tasks, and the columns organize those tasks by their progress or current stage in development.

Elements of Kanban that make it truly agile 

  • Visualize the workflow
    Capture your team’s high-level routine as a series of steps (If you are unsure, start with the steps Specify, Implement, and Validate).
  • Limit work in progress
    Implement a pull system on the workflow by setting maximum items per stage to ensure that a card is only “pulled” into the next step when there is capacity.
  • Feedback loop
    Run your daily standup at a set time each day, focusing on issues that block work from progressing (cards from moving between columns).
  • Manage the workflow
    This can be made achievable by managing workflow and monitoring performance on the go in order to fix obstacles as they occur.
  • Adapt to the process
    Track external input that is blocking the implementation of a work item (such as a late or unstable dependency) by documenting it in the implementation step. 
  • Improve collaboratively
    Work through a problem (as a team) more smoothly and effectively by having a shared understanding of your workflow and end goals.

KANBAN PROS

  1. Kanban methodology is easy to understand.
  2. It maximizes the team’s efficiency.
  3. There are no set roles,  so there is flexibility in terms of individual responsibility. 
  4. There is less time spent in meetings like planning and retrospective meetings.
  5. Kanban has no mandatory requirements for estimation.
  6. Changes can be made to the backlog at anytime.
  7. It reduces the time cycle of the process.

KANBAN CONS

  1. An outdated Kanban board can lead to problems in the development process.
  2. The team can end up making the board overcomplicated.
  3. There can be a lack of timing as there are no given time frames for each phase.

Scrum

What is Scrum?

Scrum is a highly prescriptive framework compared to Kanban. It’s included in one of the most notable agile methodologies and requires detailed and restrictive planning, has predefined processes and roles. It mainly focuses on team productivity and continuous feedback.

The Scrum framework is based on 3 pillars:

  1. Transparency
  2. Inspection
  3. Adaptation

The term is inspired by rugby, where a scrum is a formation of players. The term scrum was chosen because it emphasizes teamwork. And it is like the rugby players where players gather multiple times to check up on the project status. Once executed, the team players have to run in sprints to score a goal.

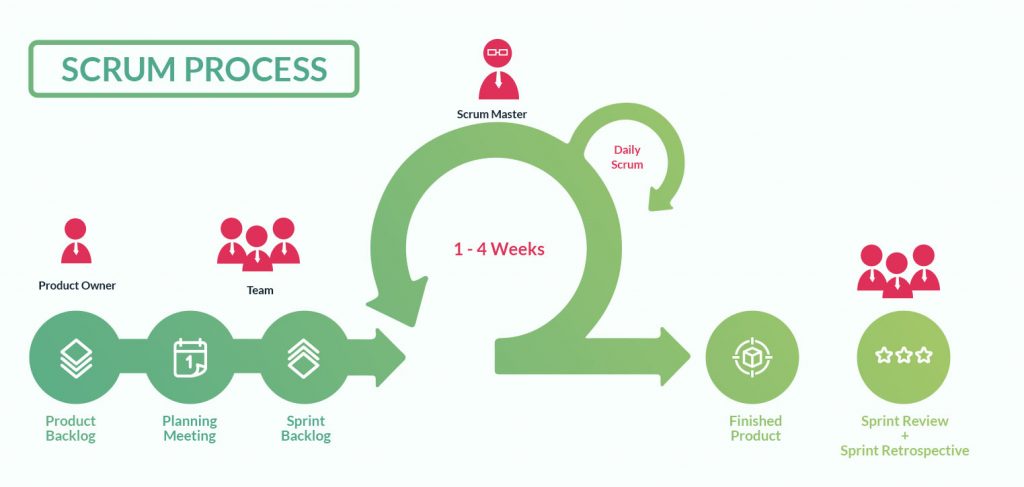
Scrum is a process to let the team commit to delivering a working product through iterative time-boxed sprints. This process is based on a specific set of roles, events, and artifacts.

scrum process

Essential elements of a Scrum

Sprint planning 

Each team member helps set goals and the team has to produce at least one increment of software within 30 days or more.

Daily scrums

This meeting is held every day to discuss any problems the team is facing to avoid any delays in the project completion.

Sprint review

The sprint review is held at the end of each sprint to go over what was delivered, how it is delivered, and what was not delivered.

Sprint retrospective

This is an end-of-sprint session where everyone reflects on the sprint process, how it helped them and how can it be improved in the future.

SCRUM PROS

  1. The methodology leads to team accountability.
  2. The team can plan what will be achieved and estimate when will be delivered. And can communicate this plan with other teams or any stakeholders.
  3. The team knows clearly the sprint goal and can resist any interference.
  4. Three is daily communication which leads to efficient problem-solving. 
  5. Continuous process improvement and retrospectives with lessons learned.

SCRUM CONS

  1. Scrum team members require to be experienced and skilled individuals, lack of experience can slow down the scrum process and obstacles can occur. 
  2. The scrum team requires a committed team. If even one team member lags, it can cause a lot of damage to the process. 
  3. A less experienced scrum master can ruin the whole process of development.
  4. If a task is not defined accurately then the entire project can be lead to inaccuracies.

Scrumban: Going agile with a hybrid approach

Scrumban, like the name suggests, is a hybrid of the Scrum and Kanban agile methodologies, which gives teams the flexibility to adapt to the needs of the stakeholders without feeling overburdened by meetings and without giving estimates. It provides the structure of Scrum with the flexibility of visualization of Kanban.

Scrubman can be divided into 7 stages. Here is a step-by-step guide to developing a Scrumban framework for your team.

Step 1: Visualization of work

Create a Scrumban board to get a full picture of your workflow. It is similar to a Kanban board and you will be using it as your primary workflow tool. Add as many columns to your Scrumban board as your team needs to mark each discrete phase of progress.

Step 2: Stop Early Binding

Don’t assign work to a specific team member as part of backlog refinement or sprint planning. 

Step 3: Impose Work-In-Progress (WIP) limits

WIP limits to columns enable the Kanban Pull System. Before each iteration or sprint, the team creates a WIP (work in progress) list of items from the backlog. These are the requirements they want to accomplish in the upcoming iteration. 

Step 4: Pull instead of Push
Stuff from Left to Right should be pulled; don’t Push. If needed add extra buffer columns for your convenience.

Step 5: Ordering is important
Prioritize the stuff in your backlog. Or add an additional step like ‘Ready’, if needed.

Step 6: No estimations
Kanban doesn’t have estimations; this means no story points and no planning poker.

Step 7: No predefined planning
Planning is done based on triggers instead of being pre-defined, weekly, or bi-weekly. When to-do reaches a threshold, planning becomes essential.  

Conclusion

Both Kanban and Scrum were created to help teams to increase their efficiency and productivity. The custom software development teams at VentureDive leverage these methods, and are counted as one of the top tech talents in the IT industry. Explore our tech talent outsourcing services to learn more.

Picking between the two (Scrum and Kanban), however, depends on the team, as they can determine the best method or framework that would increase their team’s productivity and save time. 

In a nutshell, Scrum is an agile process that allows the team to focus on delivering business value in the shortest time possible. Whereas, Kanban is a visual system for managing software development work. With the Kanban method, there is continuous improvement, productivity, and efficiency. Scrum is centered on the backlog while Kanban revolves around the dashboard. The scrum master acts as a problem solver. Kanban encourages every team member to be a leader and promotes sharing responsibility among them all. Scrum advises time-boxed iterations whereas, Kanban focuses on outlining a different duration for individual iterations. In the end, the team members should carefully observe all the available methodologies and decide which seems likely to meet their needs. 

icon-angle icon-bars icon-times